This page is dedicated to share scale modeling and other hobbies to all other enthusiasts who also love these stuffs. Hope you enjoy and please feel free to give me some comments no matter good or bad. Joey
Showing posts with label Ferrari F60. Show all posts

Sunday, July 4, 2010

Scuderia Ferrari Marlboro F60 (11)

After some touch up with the wheel caps, some little decalings and painting on the tyres, this one is finally completed!
Accidentalling I have DROPPED the fron wings onto the floor!! Little paints are cracked and have to be fixed with some gluing..... which of caused have impacted on the outcome.... Anyway, I have to admit the fault that I was too careless when handing the kit around the places. So, I have to accept the result afterall.
This is really a very interesting kit to build. I hope you have enjoyed my progress so far. Thanks for watching.


Tuesday, June 29, 2010

Scuderia Ferrari Marlboro F60 (10)

The chassis has is now ready and here is a snapshot of the ride.

Sunday, June 27, 2010

Scuderia Ferrari Marlboro F60 (9)

More progress for the carbon fiber parts. Together with some silver colorings, I have managed to complete the assembly of the engine. The next step will be a final polish on the cowlings and some final touch up with the reds. And that will be the last steps of this progress.


Friday, June 25, 2010

Scuderia Ferrari Marlboro F60 (8)

Earlier in June, I have started the polishing of this F60. However, I have rubbed it so hard that I have even rubbed off part of the decals! Especially I have damaged the SF logo! Ihave no backup decal and I would have o fix it wih my hand painting skill..... So this is the fix and I have to clear coat the whole thing once again and sit and wait for another couple of weeks....


In a couple of weeks, the clear coat is ready for polishing.
Magically, I have recovered my Modeler's Top Compound 2000 which I thought I have lost it. So I have bee using this together with Ricebox Compound for the polishing.
Afterall, Hasegawa compound and was were also employed at finishing touch.

And I have started preparing the parts which are to be carbon fibre right away.
At some parts, I have be decalling with Studio27 CF decals, But for mos of the chassis parts, I have decided to have them sprayed over a net so it saves so much time to realise the CF effect.

Wednesday, April 21, 2010

Scuderia Ferrari Marlboro F60 (7)

Finally, after being stuggled with the carbon decals for awhile, the cowlings are ready to be coated with some GX100 Clear. I have applied just a very light layer at the moment in order to seal the decal first. Appearantly some of the carbon decals didn't really lay very well and bubbles were spotted. Some tiny cuts were made and the decals were fitted with some decal setter.
Some thicker coatings will be applied later on.

Tuesday, April 6, 2010

Scuderia Ferrari Marlboro F60 (6)

From time to time, some carbon fiber decals are somehow supplied with the kit. Yet, some of them may not present the pattern well enough, or I should say, some afte-market CF decals are way better. As a result, even the shape is there and you just need to put it in place, but you still would like to apply the after-market decals with the same shape.
Here is a little trick that I have recorded on my own so you may take as a reference.

First of all, paste a piece of masking tape over the original decal.


Then cut out the entire shape of the decal with no transparent edges.


Unmount the masking tape from the original decal and post it at the back of the after-market decal. This time, I am using the Studio27 one. Be sure you manage to turn the left and right side correctly. In this case, my decal is a symmetric one so it does not matter.


Cut the decal with the shape of the masking tape and you will be able to get an identical decal with the new pattern.


Simple and easy. And you may now enjoy more variations from different brands of CF decals.

Friday, April 2, 2010

Scuderia Ferrari Marlboro F60 (5)

I have got a light clear coat of Gunze GX100 over the TS paint. In this way, the enamal nature of the color paint can be sealed and future paint will not be affected. Also, as the TS-58 is a metallic or pearl paint in its nature, a clear coating before applying decal also helps to prevent silvering with a polishing clear coat is applied.

After some days letting the GX100 is dry thouroughly, I have started apply the decals over the cowlings. There are only limited sponsors decals around, so it is actually not a tough job to do. But at certain point, I do recommand applying carbon decals before the sponsor decals as later, I found that a couple of those sponsor decals lay on top of the CF!

Thursday, March 18, 2010

Scuderia Ferrari Marlboro F60 (4)

After a couple of weeks, the de-canned paint has settled and also grew a little thicker. This will be doing me a lot of good in the coming painting work.

Before actually applying the de-canned TS85 paint, I have a final check of the cowlings to make sure no pin marks were missed and to fixed some of the gaps. And them primed the entire frame with Finisher Foundation Pink. This should help to give brightness to the red on top of it.
I have painted both sides of the end plates before hand so the white at their top part is painted first.


After the primer, the de-canned TS paint was diluted with Gunze lacquer thinner. In this way, the paints are not subjected to lengthy drying time as normal enamals.
The covereing power of this paint is good. I can easily get the color saturated without over-shooting the color into a darker tone.


The parts will be un-touched for some while until the paint dry out. In the mean time, I can work on something else like the cockpit, the engine.... or some other kits as well. XD

Monday, March 1, 2010

Scuderia Ferrari Marlboro F60 (3)

Finally, I have found myself a comfortable moment when I can sit down a while and get this little thing done. What I am trying to do is to collect the paint in the spray can with great care so I didn't risk any chance spitting the paint everywhere.

There are a few things to be prepared, a paint bottle; some pieces of clean paper; a straw; a rubber band and some blue tack.

First of all, cover the openning of the bottle with the paper and fix it with a rubber band. Then prepare a 3~4cm of the straw.
Open a little hole at the roof of the bottle. Install half of the 3~4cm straw into it. This time, fix the straw with some blue tack so the straw wouldn't drop into the bottle or rise when the air is pushing from inside of the bottle.

The picture below shows my first attempt tonight.
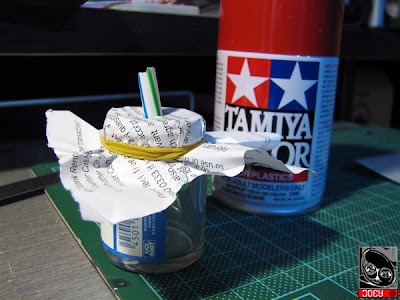

However, After a few sprays, I felt the need to cut open some little holes on the roof. This let the compressed gas releasing from these holes instead of pushing back towards the straw. (Well, you may imagine by the time the gas releasing from the straw, the paint comes together too!)
So finally, I have opened some little hole around the straw too.
After some careful "spraying", I have collected half bottle of the TS-85 paint. You may notice the bottle looks like a can of coke refresh from the refrige. And indeer it is very cold. I am not very good at Physics but I can tell it is a perfectly physic stuffs. So no worry! When the paint cool down for a while, it is as normal as what came out from a regular Gunze paint.


And here is the finished one, a pure TS-85 paint for airbrushing.
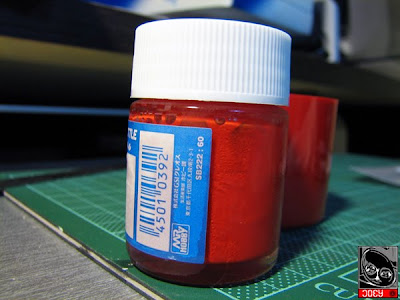
PS: I have just be able to collect half bottle, because then I have collect certain paint in the bottle, an extra spray push a lot of paint from those little holes. I think the size of the bottle and the size of the holes has limited the amount of gas releasing from the inside. I am really not some Physics guys but anyway, I think I can get some more of the paint with ease later on even I have used up this half. So why would I risk messing up the place?!

Sunday, February 21, 2010

Scuderia Ferrari Marlboro F60 (2)

Over the week, progress has been so slow as the Lunar New Year has been a very cold one. I have mildly moved in my own bedroom..... So what I have got are just some very simple steps, like sanding around the cowlings here and there and filling up gaps between parts.

The nosecone has been assembled. A very tiny photo etch from the Studio 27 parts was planted at the very front.


The floor was a major disaster of injection marks. I have filled some of them which are exposed in curbside form. Some little parts at the floor were also assembled.


I have tried to assemble the rear wing with some tiny pins from Ricebox. Some 0.4mm drillings are done back and fore. This looks great as long as the parts are still free from any paints, polishing and sanding. I hope these steps will hold the holes tight so it can still be finally assembled like this afterwards.


So, the stuffs are happening altogether, and things are looking like a F1 now.


The platings are all removed from the parts. This allows better painting work, when some little weathering will be applied.

Some of the cowlings are primed so I can check the filling and sanding works were right.

Monday, February 15, 2010

Scuderia Ferrari Marlboro F60 (1)

It has been a little while that I am resuming modeling. As there are a few new releases like the Tamiya Ferrari F60 and Honda RC166, Top Studio Yamaha YZR M1 2009 and the Aoshima Mercedes SL63 AMG, I really need to start clearing up some of the stocks.

After a little discussion with one of my fellows, we have decided to do there together and the first to start with is this Tamiya Ferrari F60. This, as compared to the M1 2009 and the RC166, will be a lot simplier and straight forward. What we really need are already here, the Studio 27 photo etching, the decals from MSM Creation, the Tamiya custom spray and a nice reference at the F1 Modeling magazines for the current couple of issues. These will let us do some straight forward builds.


And to start with, I have pre-assumbled the cowlings altogether and things are all in its place and up to Tamiya standard. At my first look of the instruction manual, I have been wondering a difficult step on the cover of the braking system. But after a test-fitting, this can be sorted out with a little trick at assumbly. So, I would say this will be a simple and fun-to-build kit.
 
free counters