This page is dedicated to share scale modeling and other hobbies to all other enthusiasts who also love these stuffs. Hope you enjoy and please feel free to give me some comments no matter good or bad. Joey

Thursday, March 18, 2010

F-14A/B Tomcat VF-111 VF-103 (1)

It has been awhile since my previous build on a Tomcat. Instead of he Fujimi kit that I have done at the start of 2009, I am returning to this Hasegawa kit. I have built the same VF-103 Last Flight a few years ago. of course, the result is not very good in the eye of today. And I will be working on 2 kits at a time so my piles of F-14 can be relaxed more quickly. So let's see how this couple will get along.


These 2 are actually 2 different versions. F-14A follows its own standard manual, while the F-14B follows the F-14A Plus manual. The main difference will be the parts used for their nozzles and some minor parts around the frame. But basically these 2 are the same kits.


There is a piece of photo etch attached to each kit. Each consists of some cockpit dashboards and some cockpit accessaries like mirrors.
I have quickly assembled the 2 cockpits with their respective PEs.


Scuderia Ferrari Marlboro F60 (4)

After a couple of weeks, the de-canned paint has settled and also grew a little thicker. This will be doing me a lot of good in the coming painting work.

Before actually applying the de-canned TS85 paint, I have a final check of the cowlings to make sure no pin marks were missed and to fixed some of the gaps. And them primed the entire frame with Finisher Foundation Pink. This should help to give brightness to the red on top of it.
I have painted both sides of the end plates before hand so the white at their top part is painted first.


After the primer, the de-canned TS paint was diluted with Gunze lacquer thinner. In this way, the paints are not subjected to lengthy drying time as normal enamals.
The covereing power of this paint is good. I can easily get the color saturated without over-shooting the color into a darker tone.


The parts will be un-touched for some while until the paint dry out. In the mean time, I can work on something else like the cockpit, the engine.... or some other kits as well. XD

Monday, March 1, 2010

Scuderia Ferrari Marlboro F60 (3)

Finally, I have found myself a comfortable moment when I can sit down a while and get this little thing done. What I am trying to do is to collect the paint in the spray can with great care so I didn't risk any chance spitting the paint everywhere.

There are a few things to be prepared, a paint bottle; some pieces of clean paper; a straw; a rubber band and some blue tack.

First of all, cover the openning of the bottle with the paper and fix it with a rubber band. Then prepare a 3~4cm of the straw.
Open a little hole at the roof of the bottle. Install half of the 3~4cm straw into it. This time, fix the straw with some blue tack so the straw wouldn't drop into the bottle or rise when the air is pushing from inside of the bottle.

The picture below shows my first attempt tonight.
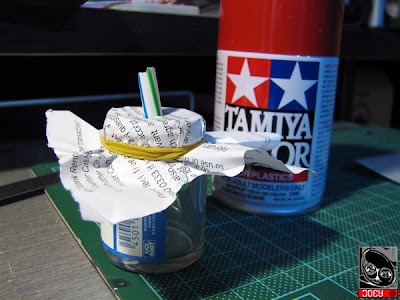

However, After a few sprays, I felt the need to cut open some little holes on the roof. This let the compressed gas releasing from these holes instead of pushing back towards the straw. (Well, you may imagine by the time the gas releasing from the straw, the paint comes together too!)
So finally, I have opened some little hole around the straw too.
After some careful "spraying", I have collected half bottle of the TS-85 paint. You may notice the bottle looks like a can of coke refresh from the refrige. And indeer it is very cold. I am not very good at Physics but I can tell it is a perfectly physic stuffs. So no worry! When the paint cool down for a while, it is as normal as what came out from a regular Gunze paint.


And here is the finished one, a pure TS-85 paint for airbrushing.
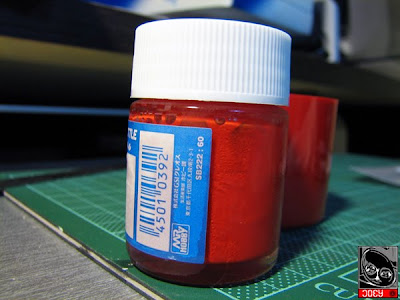
PS: I have just be able to collect half bottle, because then I have collect certain paint in the bottle, an extra spray push a lot of paint from those little holes. I think the size of the bottle and the size of the holes has limited the amount of gas releasing from the inside. I am really not some Physics guys but anyway, I think I can get some more of the paint with ease later on even I have used up this half. So why would I risk messing up the place?!

Sunday, February 21, 2010

Scuderia Ferrari Marlboro F60 (2)

Over the week, progress has been so slow as the Lunar New Year has been a very cold one. I have mildly moved in my own bedroom..... So what I have got are just some very simple steps, like sanding around the cowlings here and there and filling up gaps between parts.

The nosecone has been assembled. A very tiny photo etch from the Studio 27 parts was planted at the very front.


The floor was a major disaster of injection marks. I have filled some of them which are exposed in curbside form. Some little parts at the floor were also assembled.


I have tried to assemble the rear wing with some tiny pins from Ricebox. Some 0.4mm drillings are done back and fore. This looks great as long as the parts are still free from any paints, polishing and sanding. I hope these steps will hold the holes tight so it can still be finally assembled like this afterwards.


So, the stuffs are happening altogether, and things are looking like a F1 now.


The platings are all removed from the parts. This allows better painting work, when some little weathering will be applied.

Some of the cowlings are primed so I can check the filling and sanding works were right.

Monday, February 15, 2010

Scuderia Ferrari Marlboro F60 (1)

It has been a little while that I am resuming modeling. As there are a few new releases like the Tamiya Ferrari F60 and Honda RC166, Top Studio Yamaha YZR M1 2009 and the Aoshima Mercedes SL63 AMG, I really need to start clearing up some of the stocks.

After a little discussion with one of my fellows, we have decided to do there together and the first to start with is this Tamiya Ferrari F60. This, as compared to the M1 2009 and the RC166, will be a lot simplier and straight forward. What we really need are already here, the Studio 27 photo etching, the decals from MSM Creation, the Tamiya custom spray and a nice reference at the F1 Modeling magazines for the current couple of issues. These will let us do some straight forward builds.


And to start with, I have pre-assumbled the cowlings altogether and things are all in its place and up to Tamiya standard. At my first look of the instruction manual, I have been wondering a difficult step on the cover of the braking system. But after a test-fitting, this can be sorted out with a little trick at assumbly. So, I would say this will be a simple and fun-to-build kit.

Friday, February 12, 2010

Olympus OM-10 - Gallery 2

Taking shots from a film camera is especially different (as compared to a digital camera) when you really don't have any idea of what images will be coming though until the films have been developed and sometimes even printed.

A roll of 36 films have to be developed at the same time, mostly by a photo stall, and you have to used the same ASA slot for the entire roll. In that sense, you have one variable, the ISO, disabled from a digital camera which allow easier shootings. In addition, as films are processed and printed at cost, each film become an expense to be employed in capturing an image. A roll of 36 films would then walk across different occasions, days and night, outdoor and indoor.

In this chapter of my gallery, I had serious mistake picking a wrong roll of film with ASA against different occasions. I had a roll of Kodak Elite Chrome EB100 slide operating at a low light and indoor environment; and a roll of Fujifilm Natura 1600 under a bright shiny day trip at Lantau Island. And these all resulted into bad pictures plus difficult shots.

Well, lesson learnt. And I will bear this in mind all the time!

Here I have the EB100 starting at 100ASA, but it seems the film has difficulty capturing the right amount of light.


This is one of the earlier pictures I am operating with largest aperture at an object. It looks great to me!


This is one of the aging gas lamps still standing and in operation. The stair next to them is a favorite spot of filming in Hong Kong.


And here I started to have some shots from the Natura 1600! I can hardly use a larger aperture in any scene all day long...... all the pitures are f8 or up!


I would say I can hardly be at a climbing trip! But I was there this time as I am trying to get as many chance as possible to take pictuer outdoor with now my OM-10 and my E-p1 as well.

Monday, February 8, 2010

Olympus OM-10 - Gallery 1

Finally, I have got a nice Epson Perfection V300 so my films can all be scanned fresh from the films. Here are some selected pictures that I am glad to share. I have been, and still are, trying out many different kinds of films, both negative and slides, so I can better compare their differences and hopefully I would be able to choose a better film option for some particular occasions in the future.

So here we go and I started with a roll of Kodak Gold color 400 as a testrun for my OM-10.


And here was a 2010 New Year Eve, when used the Fujifilm Superia 200, trying out different ASAs.

In a sharp contrast I then have a roll of Fujifilm Xtra 400, which many Internet opinions said it is a great choice for general purpose.


In the middle of my Macau holiday, I have employed my very first roll of positive film, the Kodak E100VS.


Later I then have another roll of Fujifilm Xtra 400 under bright day-light. It works pretty differently with differnt lighting environments.


Still in process are a couple of slides now and I will be picking up the developed films tomorrow and hopefully I will be able to scan those pictures later this weekend.
I can say I am deeply addicted to film photography, as compared to digital photography. As you can see I got my OM-10 back at December and by Feb 2010, I am developing the 6th roll of film already! So I guess I am trying to so some extensive training on photography and hopefully I will be able to shoot at some better shots later on.
Thanks for reading and I am really happy to share with you my new addicts.
 
free counters