This page is dedicated to share scale modeling and other hobbies to all other enthusiasts who also love these stuffs. Hope you enjoy and please feel free to give me some comments no matter good or bad. Joey

Monday, September 2, 2013

Honda CB750 Custom

Hi mates! 
I am so glad to share with you all my latest project. I wasn't able to upload the pics before as you know I have been busy with my cycling hobbies ~~ haha ~~
Anyway I am undergoing a transition at work so have been able to get some relief on my evenings. And that's how I have got some quality time to get this project started.
Here is the deal. It is a classic Honda CB750. I know nothing about this ride until I started digging for references on the Internet. And in fact, I still don't know much about it at all now. Yet, I've got some gorgeous pics of some custom builds of this CB750 and these pics inspired me to give a try.
I didn't have a clear idea on where I want it to go. But I think step by step, I will bring it to the finish. 

Here is the original box-art, classic but not so exciting.... LOL

I, of course, started by putting the major blocks of the engine together.

And started pre-assembling the frame.

The original cowlings looks like this.

And that was what I actually pull over... and started reshaping the new fuel tank.


After sanding and sanding and sanding, I think this is what I would like the fuel tank to look like.

Putting aside the sand papers, I have moved to something else. This was real fun to rework the springs and this gives a lot more depth to the details.


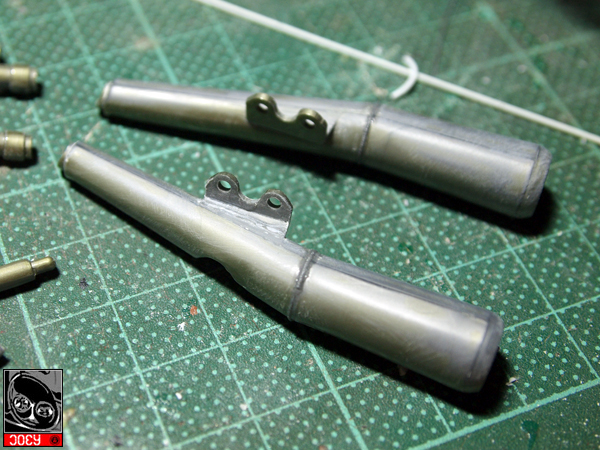
The exhausts were prepared. Gaps are filled and the welding was recreated.
I scratch-built the saddle with plastic sheets. I was about to give more volume to it later on.

The tail of the frame has been shorten and I added a copper rod to close both ends.


The saddle will contains better finishes if the edge are well sorted.

I have also added the physical mount which should hold it tight on the frame.


Let's see how these things look when come together.


The handle bar will be with a completely different angle. So the mounts had to be recreated.


I have also got some ideas on the new meter. I will just give one meter on this bike instead of two.

I know it is a bit to digest. Let's stop here for now and I will keep you posted with any updates. Thanks for reading.

Thursday, August 1, 2013

Captain William Kidd, 1689 (4)

Some more updates on the trousers, minor details on the arms and hands.
Plus the should gaps were filled and repainted.


Friday, July 26, 2013

Captain William Kidd, 1689 (3)

Started to work on the coat but was not hundred percent in form. So I think I will need to rework on it for a couple of times further.


Tuesday, July 23, 2013

Captain William Kidd, 1689 (2)

Just started to work on the scarf, was trying the way to recreate the texture and softness.


The next day I was working on the few other accessories, including the belt, hat and the little white scarf on the neck. The next item to get painted will be the coat where I will need to paint with the arms attached. Let's see how it goes or I may need to do a little putty work there.


Wednesday, July 17, 2013

Captain William Kidd, 1689

This has been a figure that I have pre-assembled a couple of years back. But I just had never had the time to actually start painting. Now, I am going to give it a go and am also looking to complete this figure by November.

This same pre-assembled look, with the sword actually broken. I will need to do some welding before painting. Anyway that can wait after the figure and the floor being painted.

A thin layer of primer was coated. The casting was a bit rough so I have to work on sanding work here and there. The difference to working on a resin or injection versus this white metal is that I will get my fingers all darkened after the sanding work....

As usual, I started the painting work with the face. The shape and casting on this part is brilliant. I have no issues even I have been a while from painting work.

The next day I worked on the inside shirt. There are a few layers of cloths on this figure. So I have to so some planning before I decide which area or which piece of cloths to start with.

Sunday, July 7, 2013

Lexus IS200 x Toyota Altezza (8)

After having one of the STI finished, I have moved my focus on this Altezza now.

I started polishing it a few days ago and the Gunze GX100 looks really promising.
Yet, I do prefer the strength and transparency of any of the 2K coatings. I do not really need to pay too much attention for not rubbing off any paints with 2Ks, since its strength other features already help a great deal.

Anyway, the body of this Altezza is now ready and I just need to prepare the rest of the painting including chassis and cockpit, which will be really straight forward.


Saturday, June 29, 2013

Subaru Impreza WRX STI double project (10)

At some points, I managed to give some progress bit by bit. Now this STI is almost finished and here are some pics taken earlier.

The chassis was painted and weathered by some washing and dry-brushing.

The Cockpit is really straight forward but there is a 2-tone coloring that I need to manage. I added some minor stuffs like decals, photo etchings, seat belts later on.


The rest on the body was wrapped up step by step.


So after some weeks, this STI is finally completed. I will need to give her a light wash over the panel lines and then she will be put into a proper case. Haha~! Thanks for watching, and I hope I will be doing the same for the Ken Block piece soon as well!


free counters